

Integration Flow
Overview
This page walks through a complete sample integration flow from user creation through bank linking and aggregation jobs (balance checks, identity, transaction history)
Create a user and link a bank
Start an aggregation job

Sample Full Integration Flow
| # | Action | Caller | Key Input | Key Output |
|---|---|---|---|---|
| 1 | Get Aeropay auth token | Backend | api_key, api_secret, merchantId, scope: "merchant" | Aeropay token (for /user only) |
| 2 | Create AeroPass user | Backend | firstName, lastName, phone, email + Aeropay token | aeroPassUserUuid (persist in DB) |
| 3 | Get Aerosync widget token | Backend | apiKey, apiSecret, aeroPassUserUuid | Widget JWT token |
| 4 | Pass token to frontend | Backend → Frontend | Widget JWT token | Token available client-side |
| 5 | Launch Aerosync widget | Frontend | token, aeroPassUserUuid, configurationId, environment | Widget rendered in iframe |
| 6 | User authenticates with bank | End User | Bank credentials (handled entirely by widget) | Bank linked |
| 7 | Capture onSuccess event | Frontend | Widget postMessage event | connectionId (persist in DB) |
| 8 | Retrieve account details | Backend | connectionId + Aerosync API token | Account/routing number |
| 9 | Create aggregation job | Backend | connectionId + Aerosync API token | jobId, status: Initiated |
| 10 | Poll job status | Backend | connectionId, jobId | jobStatus → COMPLETED or MFA_REQUIRED |
| 11 | Handle MFA if triggered | Frontend | jobId, connectionId, handleMFA: true + new widget token | User completes MFA in widget |
| 12 | Retrieve data | Backend | connectionId + Aerosync API token | Balance / Transactions / Identity |
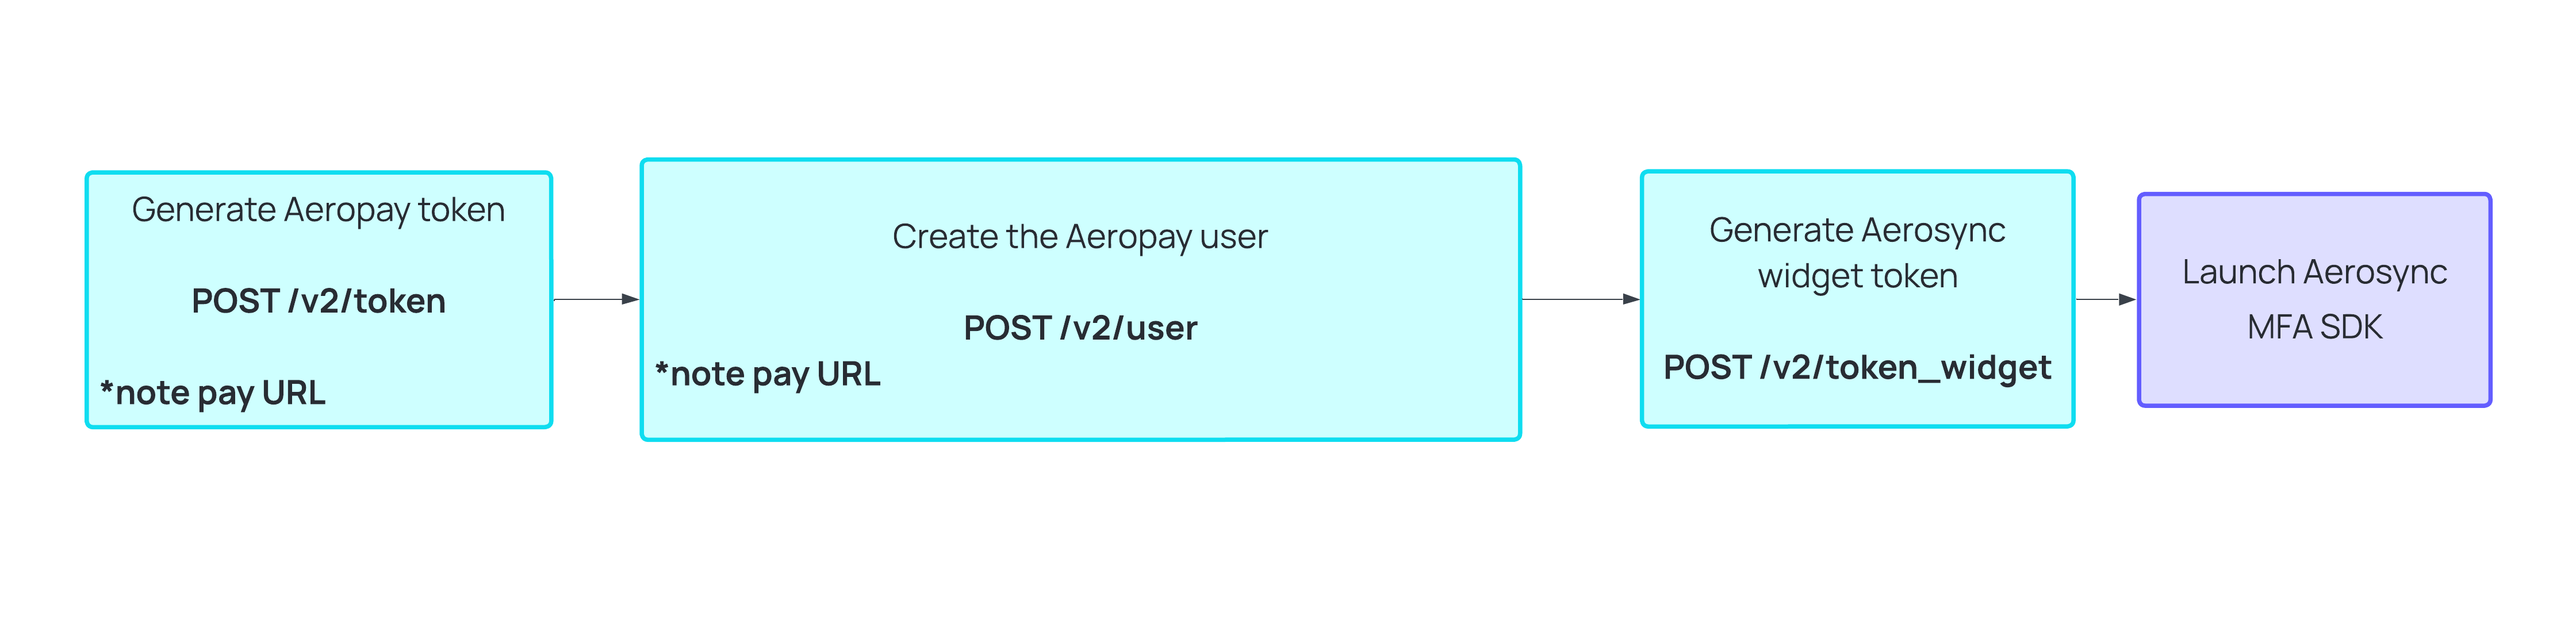
Step 1–2: AeroPass User Creation
User creation is a server-side operation. Never expose your API credentials to the client. The aeroPassUserUuid returned must be persisted in your database — it is the permanent identifier for that user across all future widget launches.
Step 1: Get Aeropay Token (for /user only)
POST https://api.sandbox-pay.aero.inc/v2/token{
"scope": "merchant",
"api_key": "<your_api_key>",
"api_secret": "<your_api_secret>",
"id": "<merchantId>"
}Response:
{
  "TTL": 1800,
  "token": "<aeropay_token>"
}
Step 2: Create User
POST https://api.sandbox-pay.aero.inc/v2/user
Authorization: Bearer <aeropay_token>{
"firstName": "Jane",
"lastName": "Doe",
"phoneNumber": "+11234567890",
"emailAddress": "[email protected]"
}Response:
{
  "success": true,
  "user": {
    "aeroPassUserUuid": "0f2542a4-8e60-4a72-b3a1-064f2d6943e8",
    "userId": "1102575",
    "firstName": "Jane",
    "lastName": "Doe"
  }
}
Warning: StoreaeroPassUserUuidimmediately on receipt. If the user already exists in your system, retrieve their stored UUID rather than creating a duplicate.
Step 3–4: Widget Token Generation
Widget tokens are short-lived (30 minutes) and tied to a specific user. Generate a fresh token on every widget launch — do not cache and reuse across sessions.
POST https://api.sandbox.aerosync.com/v2/token_widget{
"apiKey": "<aerosync_api_key>",
"apiSecret": "<aerosync_api_secret>",
"aeroPassUserUuid": "<uuid>"
}Response:
{
  "status": "success",
  "statusCode": 200,
  "token": "<widget_jwt>",
  "userId": "<internal_id>"
}
Step 5–7: Widget Launch and Bank Linking
For this example, we will show the web SDK. Aerosync does support a breadth of SDKs depending on your tech stack. Those can be found here.
Install the NPM package:
npm i aerosync-web-sdkAdd the mount point to your HTML:
<button id="openBank" @click="openAerosyncWidget()">Connect Bank</button>
<div id="widget"></div>
Initialize and launch the widget. The onSuccess callback is your most important handler — it delivers the connectionId that gates all data retrieval.
import { openWidget } from 'aerosync-web-sdk';

const widgetRef = openWidget({
  id: 'widget',                         // must match your div id
  iframeTitle: 'Connect Bank',
  environment: 'sandbox',               // 'sandbox' | 'production'
  token: '<widget_jwt>',                // from Step 3
  aeroPassUserUuid: '<uuid>',           // from Step 2
  configurationId: '<configId>',        // optional, for custom branding
  style: {
    width: '375px',
    height: '688px',
    bgColor: '#000000',
    opacity: 0.7
  },
  handleMFA: false,                     // set true when re-launching for MFA
  onSuccess: (event) => {
    const { connectionId } = event;     // CRITICAL: save this to your DB
    console.log('Bank linked:', connectionId);
  },
  onError: (event) => { console.error(event); },
  onClose: () => { /* handle user exit */ },
  onEvent: (event, type) => { /* optional page-level analytics */ }
});

widgetRef.launch();
Note: For mobile apps, setwidgetLaunchType: "systemBrowser"and provide adeeplinkURL so OAuth bank flows can redirect back to your app after external authentication.
Step 8: Retrieve Account Details
Generate an Aerosync API token. Please note this is separate from the widget token:
POST https://api.sandbox.aerosync.com/v2/token
Content-Type: application/json

{
  "apiKey": "<aerosync_api_key>",
  "apiSecret": "<aerosync_api_secret>"
}
Then retrieve account details:
GET https://api.sandbox.aerosync.com/v2/accounts/{connectionId}
Authorization: Bearer <aerosync_api_token>
Key response fields:
| Field | Description |
|---|---|
accountNumber | Full account number (may be tokenized) |
routingNumber | 9-digit ABA routing number |
accountNumberType | "Tokenized" or "Non-tokenized" |
connectionStatus | "CONNECTED" or "failure" |
connectionExpiry | ISO 8601 timestamp — monitor for reconnection flows |
canFetchBalance | Boolean — check before triggering balance jobs |
Steps 9–12: Aggregation Jobs
All three job types follow the same four-step pattern: (1) Create job → (2) Poll status → (3) Handle MFA if triggered → (4) Retrieve data. The only differences are endpoint paths and response schemas.
| Job Type | Create Job | Retrieve Data | Notes |
|---|---|---|---|
| Balance Refresh | POST /v2/accounts/{connectionId}/refresh | GET /v2/accounts/{connectionId}/balance | canFetchBalance must be true. Not available for manually linked users. |
| Transaction History | POST /v2/accounts/{connectionId}/transactions | GET /v2/accounts/{connectionId}/transactions | Returns recent transactions with date, amount, description. Not available for manually linked users. |
| Account Identity | POST /v2/accounts/{connectionId}/identity | GET /v2/accounts/{connectionId}/identity | Returns account holder name, address, email. Only one job can run at a time — AC-112 if conflict. |
Polling Pattern & Webhook
After creating a job, you can either poll the status endpoint until a terminal status is returned or listen to the job.<job_status> webhook.
GET https://api.sandbox.aerosync.com/v2/accounts/{connectionId}/job/{jobId}
Authorization: Bearer <aerosync_api_token>{
"status": "success",
"statusCode": 200,
"jobStatus": "COMPLETED",
"mfaTriggered": false,
"jobId": "REF-c869a583d3274a6aa2cbc45ef106f805",
"connectionId": "68c13bc0855a4f85853f6aafaa43e461"
}| Job Status | mfaTriggered | Meaning | Action |
|---|---|---|---|
Initiated | false | Job queued, not yet running | Continue polling |
IN_PROGRESS | false | Actively fetching from FI | Continue polling |
COMPLETED | false | Data ready | Call data retrieval endpoint |
MFA_REQUIRED | true | FI issued MFA challenge | Re-launch widget with handleMFA: true |
FAILED | false | FI or connection error | Check AC error code. Retry once. If persistent, surface reconnect widget. |
Recommended polling interval: every 2–3 seconds. Set a maximum of 30 attempts, then surface an error to the user.
MFA Handling — Re-launching the Widget
When mfaTriggered: true is detected, generate a fresh widget token and re-launch the widget in MFA mode:
const widgetRef = openWidget({
  token: '<new_widget_jwt>',            // fresh token required
  aeroPassUserUuid: '<uuid>',
  handleMFA: true,                      // required
  jobId: '<jobId>',                     // required when handleMFA is true
  connectionId: '<connectionId>',       // required when handleMFA is true
  environment: 'sandbox',
  id: 'widget',
  iframeTitle: 'Verify Identity',
  onSuccess: (event) => { /* resume polling */ },
  onError: (event) => { console.error(event); },
  onClose: () => { /* handle close */ }
});

widgetRef.launch();
Tip: After the user completes MFA in the widget, resume polling the job status endpoint. The job should advance toCOMPLETEDwithin a few seconds.
Updated 4 months ago